DIY Wedding

DIY Wedding Gown #1 – Summer

“Ooh move!  I wanna see the bride’s gown!”

We all know that people stand for the arrival of the brides to catch a glimpse of her dress – at least the girls do.  Trying on the pretty gowns is also probably the best part of wedding planning.  I thought I would be one to spend hours/days/months visiting and re-visiting bridal shops before I’d settle on ‘the one’ but it only took me 20 minutes to find my fixer-upper dress (very excited about it!)

But I had an easier time picking my gown because I planned to wear multiple dresses – one for every season of the year 🙂

For the summer dress, my inspirations are:

I loved the Kate dress by Ellebay Bridal with the flowiness and the lace.  But when I saw the BCBG gown, I knew that would be perfect for a summer, beach wedding.  Especially with the light organza which doesn’t restrict movement and would not weigh me down if I wanted to walk into the water.

So a quick sketch to plan out how to connect my favourite elements of both gowns –

Fabricana is like my candy store.  I can spend hours in there – three to be exact.  You have no idea how hard it is to find beautiful lace.  The pattern I picked was a very common one that comes in many colours for a reasonable price.  Organza was on sale so bonus for me!

After picking up lining and notions, I was ready to start!

There are many sources on YouTube, even for the untrained DIY bride, to figure out how to create a pattern from a dressform.

1) Place muslin fabric (or any non-stretch scrap material) and pin onto the lines you marked.  Cut off whatever you don’t need!  Do this for half of the dressform.  You simply need to double it when you cut the fabric to create the other side and it will be symmetrical.

2) Remove the muslin pieces from the dressform and trace on paper, adding 1.5cm seam allowance around the edges.  Mark the corners, notches, darts, etc.  Place onto fabric and lining and cut.

3) Sew the bodice and skirt pieces separately.  Attach the bodice to the lining and make sure it fits!  Add bias tape to the waist of the lining to prevent stretching.

4) Pin the bodice onto the dressform and drape the lace over it.  Pin in place, creating the form of the body.  Using similar coloured thread that blends into the lace, handstitch it onto the bodice and onto the skirt.
With right sides together and the bodice in between them, stitch together the skirt to the lining. Add invisible zipper to the back.

5) Tear the strips of organza by hand.  Since it’s woven, non-stretch material, it rips very well and ends up perfectly straight.  Create a rolled hem all around the edges of the strips using a serger.  Fold the strips in half and press with an iron – props to Ursula for doing all of this part!

Pin onto the hip of the dress to determine the distance between each strip.  Take it off the dress and connect them all together by stitching 5cm between them (imagine being little people holding hands).

Pin the strips back onto the dress and space them out evenly.  Handstitch each piece into place.

So now comes the problem solving part of DIY projects, especially if you’ve never done them before:

  • The strips looked like an accordian after tacking it in place, not at all like the BCBG dress.  I played around with it a bit and pulled down each strip slightly, rolled it behind and tacked in place.  Looked more like a pumpkin after that but much cuter and I didn’t mind the reference since it reminded me of Cinderella 🙂
  • The sides were too bare and every time I bent my body, I would flash someone so I took some spare lace lying around and handstitched in onto the sides to close it off and add a bit of embellishment.
  • Ursula noted that there was something missing and said I should add a sash because the waistline looked bare and incomplete.  I felt a sash would add too many varying materials into the dress and cheapen the look.  So I dug around and found this $5 faux pearl necklace I thrifted when I was visiting Oregon coast.  Lo and behold, not only is it the perfect addition the dress, the length fits around perfectly!!!

And *drum roll* the final product!
Total cost was about $55.  Not too shabby!

I was extremely happy with the product and I finished it not a moment too soon – on the day of the photo shoot.

Photographer – Jun Ying of Kunioo  assisted by the talented Miya Gu
Bouquet/boutonniere – Lisa Wong of Blush Floral Designs
Makeup/hair/styling – Elena Tsang (me!)
Special thanks to –  Sam Chin for the suit; Ursula Tsang for assisting me in this project; Brenda Tsang-Chu for baking delicious treats used as props in the shoot; Jason Fung for being an awesome fiance and prepped the other props for the shoot.

Enjoy some pictures of it flowing in the wind!

Uncategorized

Post-Wedding Bliss

To the past brides out there – ever get the feeling that your wedding is not really yours?

You have to consult with parents to make sure that the dress is appropriate, the make-up is not too out there, the hair is formal, the food is acceptable, ya di ya da.  At any rate, Paula would have looked good in a rag and the wedding definitely was her in many ways but only the side of her that can be displayed at an ‘appropriate’ wedding.

Isn’t she lovely?  Yes, that is yours truly by her side.

For me, I always recommend the bride to go with the ‘look back and won’t regret’ route with regards to hair colour, hair style, make-up, etc.  However, the au naturel approach doesn’t always apply because some people truly do not feel like themselves when, for example, they keep their natural hair colour.  That’s why hair, make-up, and styling can be so cool – you can show the world who you are as an individual or as a couple.  And if you can’t do it on the wedding day, you can do it with a post-wedding anniversary photoshoot 🙂

Vivid Moments Photographers (Raymond) is very fashion-oriented, paying particular attention to posing which highlights a woman’s best features.

Paula is all about fashion and her evening gown didn’t get a hint of justice on the big day.  First off, the gown is more risque which is so her style.  Second of all, it’s from Japan – the country where the couple were engaged and where her style was based for the last few years.
Unfortunately, there were insufficient photos from the reception to capture it’s beauty.  But no matter!  This time around, we had the chance to give her the hairstyle and make-up of choice to match the fab dress.

[Unedited Snapshot]

Makeup:
Inspired by models in Japanese fashion magazines – the more natural type, not ganguro-style or the ones where your lashes are attached 1cm below your actual eyes.

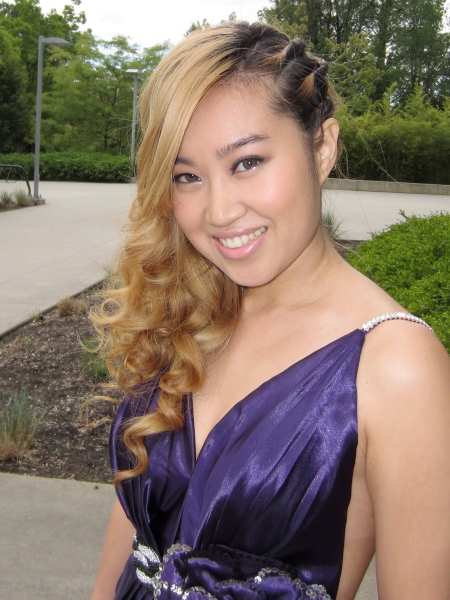
To get the look –  Use purple shadow on the lids and blend with a brown at the crease.  Thin black eyeliner and a bit of purple glitter below the lower lash line (if you can’t already tell, purple is her fave colour).  A medium coverage foundation to perfect the skin, topped with a cool pink, slightly shimmery blush to add a glow and a bit of bronzer to sculpt cheeks.  Lip colour is also a cool toned, muted pink with a thin layer of gloss to add fullness.

Hairstyle:
Half-good-girl-half-bad-ass is probably the best way to put it.  This was inspired by a character in a Taiwanese drama who wore her short hair similar to this on her wedding day.  Paula coloured her hair in Japan which she has been itching it do ever since she had to grow out her natural locks.  Though deemed inappropriate for the actual wedding, this style definitely showcases Paula’s multifaceted characteristics.

To get the look – part the hair and section away the fringe.  Curl hair using a clampless iron.  Section, twist and pin (into the twist) the side opposite the fringe.  Curl and position fringe so it swoops nicely into the curls.

And here are a few more!

Your exclusive BTS look:

Uncategorized

Floral Glamourous

Wedding season nearly makes blogging impossible so some of you may have already seen the images months ago but it’s never too late to take a closer look!

I worked with Foroogh earlier this year (read here) and we both planned to work together again.  Another talent I was planning on working with for some time now is Vancouver fashion photographer Kenneth Kwok.

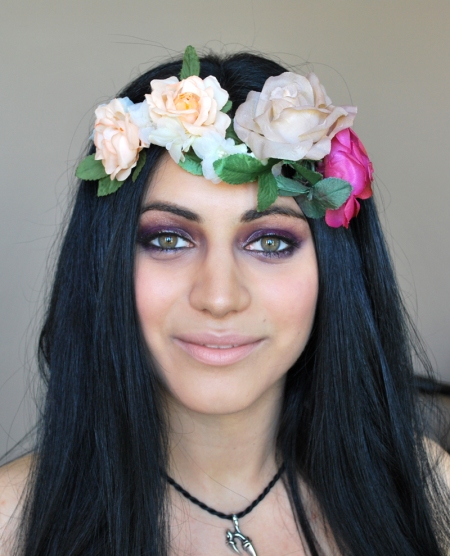
I wanted to do a classic glam shoot with a little black dress and a bold lip.  Kenneth wanted to do a outdoor shoot with a floral headpiece.  Foroogh was flexible and up for trying something different, in which case, both these looks are quite different from her gothic style.  So after much consideration (-_-) we chose to do both!

One of the biggest challenges of fulfilling an inspiration for a shoot so far has been styling.  My closet has been frequently raided for my shoots because, to be honest, I have way too many outfits for my own good and it’s nice to make use of a dress I’ve worn only once.  But not everything will fit the model and not everything can fit the theme either.

Some items just aren’t easy to find in stores if they’re not the latest trend.  So Foroogh and I hit up Dressew (the biggest fabric warehouse located downtown) to pick up a couple of things to create the outfit I had in my mind.  We found everything we need within half an hour and she offered to make the headpiece while I made the outfit.  What a team! 🙂

The hair style was a somewhat messy and wavy, meant to be blown in the wind.  The make-up was what I wanted to focus – a warm purple, glittery ‘n glossy eye, flawless flushed skin, and nude lips.  It was a mistake to apply the face gloss so early on in the shoot because as many of you who have tried, gloss is not meant for longevity.  It was creasing a lot throughout the shoot, but fortunately, that less-than-perfect look was ironically perfect for the theme and setting.

The shoot was amazing and I did more than beautify, I was the official wind-maker, flapping around a reflector multiple times to create wind-in-hair effect.  Here are some of my fave photos (edited by F).  Check out the final images here!

Floral took longer than expected so we didn’t have quite enough time for Glam.  Either way, we made it work.  I pulled out muh baby – the black dress I had my eye on for awhile selling for $100 and found it finally on sale for $40 which was the last one on the rack and was actually my size!  I was practically beside myself with stress when I handed it to Foroogh with the tags still on, but sacrifices must be made and she was very careful with it 🙂


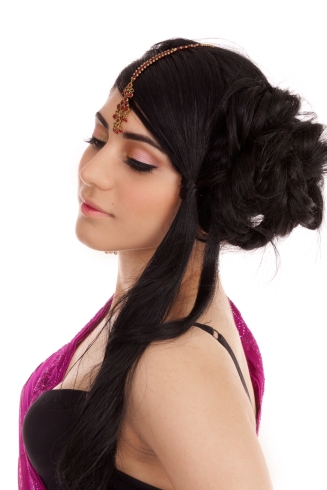
Make-up was a bit of a twist from the classic red lip, winged eyeliner look.  The eyes looked winged when opened, but was a shaped, blended shadow when closed.  I wanted the lips to be classic but modern so I opted for a fuchsia colour instead. We also thinned out her brows for this look so it’s more polished than the au naturel Floral style.

I started with her hair swept to one side but it ended up looking too ‘prom’ than glam so up it went – a giant, teased bun wrapped with a lace braid.  It’s actually the perfect hairstyle for all the ladies with long hair when you want it out of your face during hot, sweaty summer days.

Once again, a few faves here and the final products here.

Uncategorized

Part III: Lady of the East

Titled by the model herself,  Foroogh (Mahafsoun) is truly unique.

When I first saw her modeling portfolio, one photo caught my eye (below) and I thought she looked like an angel:

When we first corresponded, her fun, kind, and enthusiastic personality matched my original image of her.

Finally, months later, on the day of the shoot, she showed up wearing a velvet corset, fishnet stockings, and platform boots – apparently her everyday gothic attire.  She discussed about her fascination with photography with Al while she waited for me to finish with Delia.  When she got into my chair, we chatted about the free spirit of bellydancing (check out her YouTube channel) and how she loves to dance to metal music.  What?!  This lovely lady is the perfect example of my philosophy – she’s dynamic, multifaceted and extremely talented.

Foroogh’s beauty is undeniable – long black hair, fair (flawless) skin, and green eyes.  She was perfect for the look I had envisioned, which was bollywood-inspired but softer.  I opted for subtle pink and gold eyes and a gradient lip.  For her hair, I couldn’t resist doing something more dramatic.  It was the perfect opportunity to employ a Sharon Blaine-inspired style.  Foroogh was so excited that she was given a ‘pretty’ look for the first time (like she isn’t already?) that she kept the hair and make-up for a night out on the town!

Anyways, she brought along with her a beautiful sari fabric and a load of accessories so we played around with them and had a great time.  Her graceful body movements showed through in her modeling – she was very comfortable in front of the camera and it was a pleasure to watch her pose.  I adored her so yes, you will be seeing more of her here.  Stay posted!

Of course, we can’t forget Al Cruickshank, the man behind the lens.  Even by the third model and many hours of waiting, he hasn’t complained once.  In my eyes, all his shots were breathtaking.  Did you like the art we created?

Check out more photos of Foroogh in my beauty gallery!