DIY Wedding

DIY Wedding Gown #2 – Winter

We’re already getting some spring sunshine and the cherry blossoms are peeking from it’s bud but I’ve yet to post up the winter gown!

So here we go!  My inspiration initially was the Oscar de le Renta gown with relatively sturdy lace and flowy back.  I attempted to recreate and rather than drafting it from scratch, I bought a pattern with a similar shape and thought to alter it later.

After doing some shopping, I realize that the lace to make that dress cost minimally $80/meter and the amount of fabric to create the flow would be just as extravagant.  That being said, all Oscar de la Renta gowns start at $5500 so either way it’ll be a steal.

Searching for more inspiration, I just went gown shopping and found the red dress by BCBG (somehow not on their website) which retails just under $400.  I liked the fulllness from the layering so I thought I could still incorporate the blue (winter theme colour) into those layers.

One thing I hate about patterns – the sizes always fit way bigger than it says.  So according to my measurements, and throwing together a quick muslin, I ended up being able to wear the dress with room to spare with all my clothes underneath.  So I pinned it to a professional dressform with similar measurements to mine.

Then altered the patterns based on the amount I pinned away.

And then made two versions – dress and lining – and the foundation with boning to keep the dress from slipping down.  Finally, hand-stitching the lining to the zipper so it’ll be invisible and perfect!

And FAIL!!!!  Not to intentionally flash boobs, but look at the horrendous shape it gives the bust.  I could barely look at it without almost crying.

I couldn’t continue with making the dress knowing how it’ll look.  But at the same time, didn’t want to start from scratch after hours (every evening for a week) of work I put into it.  At the end of the day, sucking up and learning from my mistakes was the only option.

So I put a bra on the dressform and stuffed it, ran several muslins through until it fit properly, and then made the foundation first to make sure it looks good on.  Instead of doing a regular lining, I made it with white flannel to add an extra layer of warmth and softness since I knew that the location of the shoot would be somewhere freezing cold.  Jason really pulled through here and helped me through a few hours of cutting and marking each new piece.

And finally…

See the difference?  The angels are singing and beams of lights everywhere!
Now we can continue with the bottom of the dress.  Measure carefully for a accuracy and write it down so you don’t forget (keep in mind seam allowances).  There are 3 layers to give the look on the BCBG dress (the actual dress had 4 layers but way too much fabric to cut…)

Then, sew each piece together individually.  Make 6 of them.  Attach them all together with panels of the dominant fabric (crepe in this case) in between.  Attach to the bottom of the dress and we’re almost done.

Since it’s a winter shoot, it wouldn’t be complete without some sort of cover-up.  I have a pattern for a cape but the original design is way too heavy for the look of the gown so I made a few changes with muslin first to make sure it falls nicely at the shoulders.

W (11)

I personally have never worked with wool or any fabric I couldn’t mark with chalk, so I ended up learning something new too – tailor tacks.

The final process wasn’t too difficult except trying to sew through 4-5 layers of the wool.  To close the top, hand-sew a hook and eye to make it easier.  You can attempt to make a buttonhole and use a nice button but the machine I was using was just not reliable enough for me to take that chance.  Instead, I made a simple flower using the leftover chiffon from the dress.

I didn’t get pictures of this part but I added little circles of chiffon (cut by Jason ) along the gown to give it the ‘snowflakes falling on snow drifts’ kind of feeling.

I’m happy with the outcome not because it’s the most amazing design ever.  I’m just so happy it’s done and fits well.  To borrow a movie quote:

From failing you learn. From success…not so much!

AUNT BILLIE, Meet the Robinsons (2007)

Photographer – Jun Ying of Kunioo  assisted by the talented Miya Gu
Bouquet/boutonniere – Lisa Wong of Blush Floral Designs
Makeup/hair/styling – Elena Tsang (me!)
Special thanks to –  Tiana Lam for the scarf; Dom Voo and Aaron Yip for lending us winter coats; Ursula Tsang for being our photo shoot assistant in the snow 🙂

  W (15)

Uncategorized

Take It With You – Makeup Eraser Sticks

While browsing in the beauty section of London Drugs, just killing time, not really expecting to find anything in particular, I caught a glimpse of these:


I was super excited.  As in my eyes bulged when I saw them and I was smiling to myself like a crazy person.

If you have eyes like mine (which a lot of Asians do) you’d find that even waterproof, smudge-proof products – especially when you use black – don’t always stay put and often transfers down to the under-eye area.  Now there are some products that absolutely don’t move at all (i.e. MAC Liquidlast Liner) but they don’t always give you the look you want to achieve.

Anyways, when I know I’ll be wearing makeup from day to night, I always carry a travel pack of q-tips and a bottle of eye-makeup remover with me, which adds weight and is bulky when you’re carrying, say, a fancy clutch.  Another option is travel size makeup wipes but they’re expensive and wasteful for small touch-ups.

So the makeup remover liquid stays in place until you the snap the end with the purple strip.  Then the makeup remover moistens the other end and you’re ready to use it!

Now the question is, how effective is the remover?  Most drugstore ones I’ve used have been pretty useless and requires a lot of scrubbing which irritates my eyes.  So here’s a swatch test using a liquid liner and dark shadows.

Not bad!

So PROs:

  • Lightweight and small – perfect for those on-the-go!
  • Effective formula to remove darker makeup.
  • Oil-free so it doesn’t make the other parts of your makeup run if you just want to touch-up.
  • Perfect for brides as part of their emergency kit.
  • Cheap or expensive?  It’s $5.99 so I’ll let you decide.  Decent for me.

No cons as far as I know but maybe I’ll figure it out after using it.

Enjoy!

Uncategorized

Clean Supreme for Cheap

Alright so who has seen this brush cleaning mitt?  It seems to be alSigma Spa Glovel the rage lately on youtube from all these makeup gurus.

When I first got an email about Sigma Beauty‘s new product, a couple of thoughts flew around my head at once:
“Yes, finally something like this on the market!”
“Darn! They stole my idea” >=|
(Although this wasn’t what I had imagined in my head.  Oh I wish I knew how to go about inventing a product and getting it made :})

After going on the website and watching a demo video of how it works, I’m thinking:
“DANG it’s expensive for an oven mitt!” – It’s $39 usd.
“It looks like it might work…kinda chunky though…not a lot of movement allowed and feels like it might slip off my hand while I’m washing”

Even after that, I was tempted enough to attempt to order it for one reason alone and also the same reason I wanted to invent one in the first place – to prevent my hands from drying out like crazy.  I wash my brushes after each client and I have a lot of brushes.  Swishing each in my hand with soap and hot water does no favours to my already-dry skin.

So I proceeded to checkout and WHAT THE HECK $11 for shipping?!  Okay, I’m too frugal (i.e. cheap) to pay $51 for an oven mitt.

As I was shopping a few days later at one of my fave stores – Daiso at Aberdeen Centre – I came across this little silicone face scrubbing tool:

It was $2 and I thought the texture and material is probably the same as the oven mitt so SURE let’s give it a go and see what happens.

My process:

  1. I wet my brushes lightly with water.
  2. Dip it into a soap solution and scrub a couple of times on the pad (in the second photo, I literally just swished 2-3 times over the surface).
  3. Rinse with warm water while scrubbing along the pad to remove excess soap.
  4. Push out excess water with clean index finger and thumb and lay them on a shop towel (more sturdy, sanitary, and absorbent)

Verdict?
I LOVE IT!

Not only did I clean my brushes in half the time thanks to the small bumpy texture, it actually removed bright red lipstick stained onto my lip brush that I normally could not get off without alternating 99% alcohol and an oil-based makeup remover.

Sure my hand still got a bit wet but nothing to compared to what it was like before.  I’m sold!  The only thing I would change is to make the surface area as big as my palm for my bigger fluffy brushes.

I made an attempt at Daiso again to see if they carry a silicone scrubbing pad for the body (^_~) but alas they did not.  Maybe one day!

DIY Wedding

DIY Crystal Hair Pins

A couple of my brides this year introduced me to BHLDN – the wedding line under the same company as Anthropologie.  I am in love with both lines because all their items are gorgeous, classic and unique.  Vintage-classic brought back to life 🙂

I was scanning for hours, pinning practically every item to my Pinterest boards, when I came across this:

Wow…pretty…
I love the whimsical look of the pins and the fancy name (Dewed Vines Hairpin) also helps set the mood.  However, with all the expenses of wedding planning, I could never justify spending $140 on two hair pins.

So I did some research here and there.  There are hairpins that are similar on Etsy and other websites but they are all fairly pricey.

One day in the summer, by total fluke, I was driving by Beazu – a wholesale bead store – about a week after it opened and I whipped around the block so I can go in and take a better look.  I was in DIY HEAVEN!  Spent hours in there trying to plan out what I wanted to make.  I found some great items to recreate these beautiful pins.

A box of tiny spools of gold wire (I think it was about $12-15), a bag of clear 4mm bicone Swarovski crystal beads ($11.62), and a bag of crystal golden shadow 3mm bicone Swarovski crystal beads ($14.81).

Depending on how long you want each vine of crystal to be, you can play around with it.  Slide the first bead into the center of the wire and start twisting for about 1 cm.  Take slide another bead into one piece of the wire and twist again.  Do the same with the other wire and keep alternating – just approximately it and do it randomly to keep the look natural.

I made 10 vines, using the two different coloured crystals but you can use pearls or different sizes and shapes of crystals to change up the look.

I grabbed a hairpin (one similar to your own hair colour) and twisted the ends of each vine individually around the hairpin.

Make the stamen of the ‘flower’ shown above and twist between the vines.  Push all the vines together and wrap a separate wire all around the hairpin to secure all the vines in place.  Re-shape the vines into anything you find attractive!  I like the pinwheel shape.

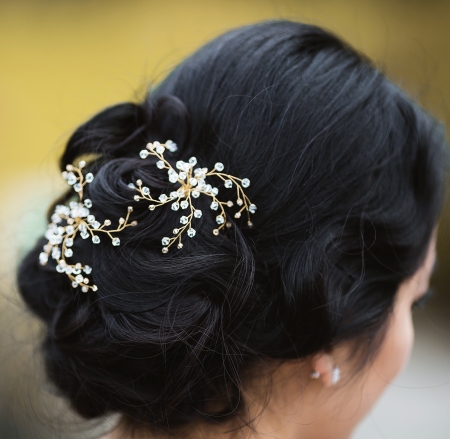
And here we go!  For about $44 (with a lot of extra materials left to make more!) you can get your own customized crystal hairpins for your big day.  They’re so classic and pretty that they can also be worn for any special occasion, like prom or Christmas parties or weddings (as a guest) or maybe even a casual summer dress for a nice night out.

Above is a shot of me wearing it during my autumn photoshoot (this was taken at the end so the hair is a bit ruffled – excuse that 🙂 ).

Since I didn’t have a dress made for this season (I wore my sister’s wedding dress instead, which is another way to get some variety in your pre-wedding photos) the hairpins tutorial shall suffice!

I chose to do a semi-vintage updo with gentle fingerwaves at the fringe and a curly full bun.  My adorable fiance attempted to help me with the bun based on a picture I showed him – you know you’re marrying the right man when he actually attempts to do your hair for you 😉  Needless to say, he became a very helpful mirror-holder for me

DIY Wedding

DIY Wedding Gown #1 – Summer

“Ooh move!  I wanna see the bride’s gown!”

We all know that people stand for the arrival of the brides to catch a glimpse of her dress – at least the girls do.  Trying on the pretty gowns is also probably the best part of wedding planning.  I thought I would be one to spend hours/days/months visiting and re-visiting bridal shops before I’d settle on ‘the one’ but it only took me 20 minutes to find my fixer-upper dress (very excited about it!)

But I had an easier time picking my gown because I planned to wear multiple dresses – one for every season of the year 🙂

For the summer dress, my inspirations are:

I loved the Kate dress by Ellebay Bridal with the flowiness and the lace.  But when I saw the BCBG gown, I knew that would be perfect for a summer, beach wedding.  Especially with the light organza which doesn’t restrict movement and would not weigh me down if I wanted to walk into the water.

So a quick sketch to plan out how to connect my favourite elements of both gowns –

Fabricana is like my candy store.  I can spend hours in there – three to be exact.  You have no idea how hard it is to find beautiful lace.  The pattern I picked was a very common one that comes in many colours for a reasonable price.  Organza was on sale so bonus for me!

After picking up lining and notions, I was ready to start!

There are many sources on YouTube, even for the untrained DIY bride, to figure out how to create a pattern from a dressform.

1) Place muslin fabric (or any non-stretch scrap material) and pin onto the lines you marked.  Cut off whatever you don’t need!  Do this for half of the dressform.  You simply need to double it when you cut the fabric to create the other side and it will be symmetrical.

2) Remove the muslin pieces from the dressform and trace on paper, adding 1.5cm seam allowance around the edges.  Mark the corners, notches, darts, etc.  Place onto fabric and lining and cut.

3) Sew the bodice and skirt pieces separately.  Attach the bodice to the lining and make sure it fits!  Add bias tape to the waist of the lining to prevent stretching.

4) Pin the bodice onto the dressform and drape the lace over it.  Pin in place, creating the form of the body.  Using similar coloured thread that blends into the lace, handstitch it onto the bodice and onto the skirt.
With right sides together and the bodice in between them, stitch together the skirt to the lining. Add invisible zipper to the back.

5) Tear the strips of organza by hand.  Since it’s woven, non-stretch material, it rips very well and ends up perfectly straight.  Create a rolled hem all around the edges of the strips using a serger.  Fold the strips in half and press with an iron – props to Ursula for doing all of this part!

Pin onto the hip of the dress to determine the distance between each strip.  Take it off the dress and connect them all together by stitching 5cm between them (imagine being little people holding hands).

Pin the strips back onto the dress and space them out evenly.  Handstitch each piece into place.

So now comes the problem solving part of DIY projects, especially if you’ve never done them before:

  • The strips looked like an accordian after tacking it in place, not at all like the BCBG dress.  I played around with it a bit and pulled down each strip slightly, rolled it behind and tacked in place.  Looked more like a pumpkin after that but much cuter and I didn’t mind the reference since it reminded me of Cinderella 🙂
  • The sides were too bare and every time I bent my body, I would flash someone so I took some spare lace lying around and handstitched in onto the sides to close it off and add a bit of embellishment.
  • Ursula noted that there was something missing and said I should add a sash because the waistline looked bare and incomplete.  I felt a sash would add too many varying materials into the dress and cheapen the look.  So I dug around and found this $5 faux pearl necklace I thrifted when I was visiting Oregon coast.  Lo and behold, not only is it the perfect addition the dress, the length fits around perfectly!!!

And *drum roll* the final product!
Total cost was about $55.  Not too shabby!

I was extremely happy with the product and I finished it not a moment too soon – on the day of the photo shoot.

Photographer – Jun Ying of Kunioo  assisted by the talented Miya Gu
Bouquet/boutonniere – Lisa Wong of Blush Floral Designs
Makeup/hair/styling – Elena Tsang (me!)
Special thanks to –  Sam Chin for the suit; Ursula Tsang for assisting me in this project; Brenda Tsang-Chu for baking delicious treats used as props in the shoot; Jason Fung for being an awesome fiance and prepped the other props for the shoot.

Enjoy some pictures of it flowing in the wind!